Welcome to "Fault Injection and Test Flow for MIPS" webpage! From here you will get information of how to start your own fault test for MIPS.
First, let's learn a bit of the background. This research is to mimic the influence that MIPS can get with hardware level fault(s) existence. In the end, for a specific piece of program, you will create a faulty instruction list consists of faulty assembly instruction types as the result of existence of hardware level faults in MIPS. If there is nothing wrong with the MIPS hardware, your faulty instruction list will be an empty list. The contents of faulty instruction list would vary from different programs. Before you start, the "Fault Injection and Test for MIPS" package is available upon email request. Please contact us through dan.wang at uwaterloo dot ca.
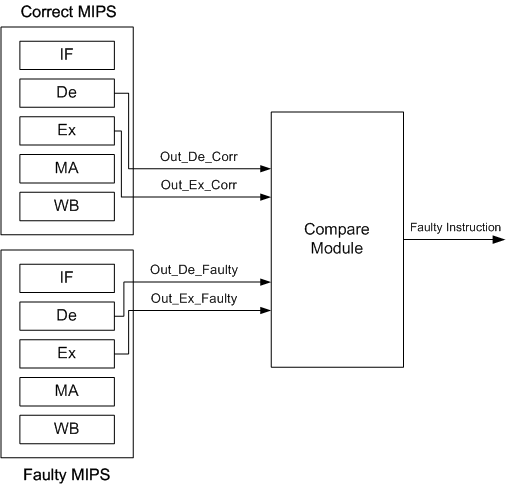
As shown in Figure 1, we build in two MIPSs for this test. One has no fault in it while the other has customized hardware level faults in it. For both MIPSs, we apply the same clock and program. When the simulation starts, by comparing the outputs of Decode stages (or Execute stages, depends on where the hardware faults locate), if the outputs in two MIPSs are different, we detect an affected instruction. Then this instruction is stored in a list and will be extracted when the overall program is finished. Please be noted, for clarity purpose, not all the interconnections are shown in these demonstration schematics on this page.
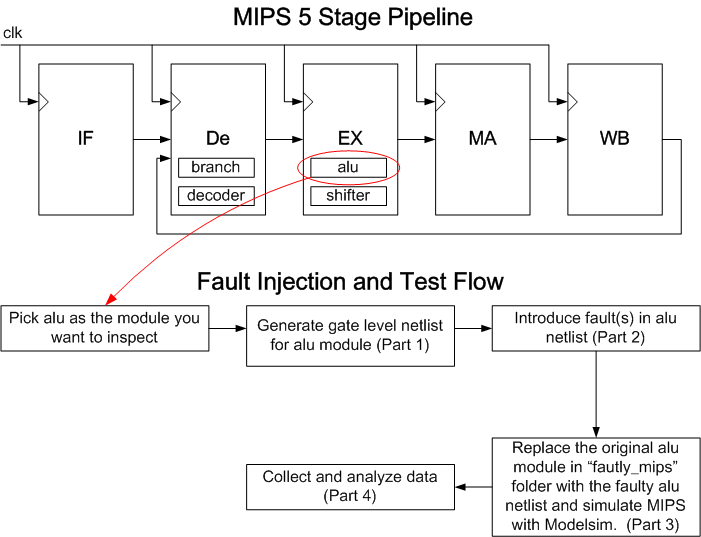
There are several steps need to follow to finally successfully generate your own faulty instruction list for a specific program. You will be following the flow below:
First you will introduce faults in simple gates. In order to do that, you need pure gate level netlist(s) for the module(s) you care about (in our case, these modules are branch, decoder, alu and shifter.). This is a two phases task, the first phase is to create a blif format netlist by Quartus II, then the next phase is to convert this netlist to AIG (And Inverter Graphs) netlist (in form of verilog) by using ABC tool.
Phase 1: Create a blif format netlist by Quartus II You will use Altera "QUIP"(Quartus II University Interface Program) to create the netlist file for MIPS modules which you are interested in. First you need to download and install Quartus II and QUIP (after Quartus II is installed successfully). By using QUIP, Quartus II is able to create a technology independent blif format netlist file for a module. After installing both pieces of software, please follow the steps below:
Now you should get the gate level AIGed netlist in verilog version.
In this Part, you will need the Python scripts to introduce faults based on the netlist files generated from "Part 1". You can do this by running the Python script called "add_fault_exhaustive.py" stored in folder "4Python". It generates modified faulty netlist files by exhaustively or in order introducing fault to nodes. Each netlist it generates only has one faulty node.
To run "add_fault_exhaustive.py", change the original netlist's filename ( the AIGed blif netlist in verilog format, e.g. "tiger_decoder_blif.v") to "netlist.txt" and make sure it is placed in the same directory of "add_fault_exhaustive.py". For detailed information, please read the readme file in "4Python/add_fault_exhaustive"
In this Part, you will set up the Modelsim simulation environment to start simulation for the faulty MIPS. To run the simulation, first you need to be familiar with the folder structure in "1Modelsim". "altera_lib" is the lib you may use in tiger_mips (this is a contribution of LegUp Group from University of Toronto). For explanation of the rest folders, please find the "readme_dan.txt" file in "1Modelsim". You also need to generate the .dat file for your program and place it in a proper place to be read by both correct and faulty MIPSs. To find out how to do this, please read readme_dan.txt in "6Windows_Tools" folder.
In this Part, you can either choose to write your own script to extract the faulty instructions stored in the transcript files which have been generated in Modelsim simulation, or you can use our Python script called "multi_trans_extract.py" to do the job. Either way, you will get your own faulty instruction list for a specific program. For detailed information, please read the readme file in "4Python\multi_trans_extract" folder.
If the information above did not give you enough hints or you stuck at nowhere, please read the "readme_dan.txt" files locate in each sub-folder for each step to make sure you didn't miss something and did necessary checks when needed.
If you have already read through all the "readme_dan.txt" files and also this webpage, still have difficult to get a simulation result, please don't hesitate to send me an email. I will reply as soon as I can.